Using the Insight API to Chart Time Series
by Justin Stewart, on Aug 17, 2016 2:18:29 PM
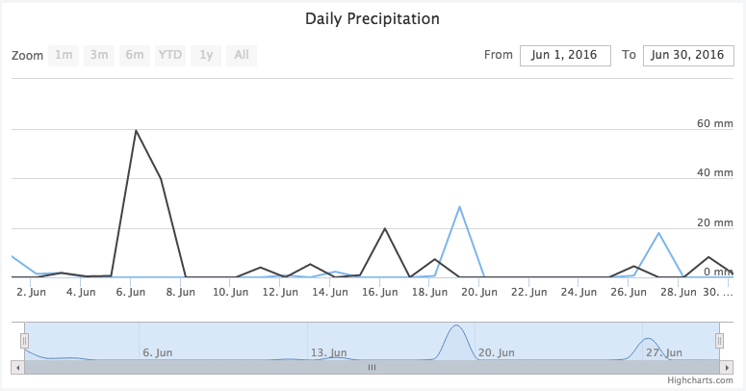
The Time Series feature in the Insight API allows us to easily query data and build charts for locations and assets over periods of time. Let's look at basic example of how we'd build a Daily Precipitation line chart using the Highstock charting library along with jQuery. We're going to compare rainfall between OKC and Jacksonville for June of this year.
TLDR; check out this JSFiddle for the full example.
Prerequisites
- Basic knowledge of HTML and Javascript
- An API key. If you don't have one, jump over to our SkyWise Weather API MarketPlace and sign up for a demo account
Setup
Create an index.html file with the following contents:
<html> <head> <!-- HIGHSTOCKS AND JQUERY --> <script src="http://code.highcharts.com/stock/highstock.js"></script> <script src="https://ajax.googleapis.com/ajax/libs/jquery/1.12.4/jquery.min.js"></script> <script src="https://cdnjs.cloudflare.com/ajax/libs/moment.js/2.14.1/moment.js"></script> <!-- OUR JAVASCRIPT --> <script type="text/javascript"> $(document).ready(function(){ }); </script> </head> <body> <div id="chart"></div> </body> </html> |
Creating the Chart
Let's start off by creating an empty chart in our document ready function.
$(document).ready(function(){ // Chart Initialization var chart = new Highcharts.StockChart({ chart: { renderTo: 'chart' }, title: { text: 'Daily Precipitation' }, yAxis: { labels: { formatter: function(){ return this.value + ' mm'; } } }, series: [] }); }); |
We're creating a chart in a container div with id "chart", giving it the title of 'Daily Precipitation', and creating a formatter that will display our units as millimeters once we've loaded our series data.
Calling the API w/ jQuery
We have a chart now, but it's empty! Let's take a look at how we can request our data using jQuery:
$(document).ready(function(){ // Chart Initialization ... // getLocationData Function function getLocationData(request, onSuccess){ var url = 'http://insight.api.wdtinc.com/'; url += request.endpoint + '/'; url += request.latitude + '/' + request.longitude; $.ajax({ url: url, beforeSend: function(xhr){ xhr.setRequestHeader("Authorization", "Basic " + btoa(request.appId + ":" + request.appKey)); xhr.setRequestHeader("Accept", "application/vnd.wdt+json; version=1"); }, data: { start: moment(request.start).format('YYYY-MM-DD'), end: moment(request.end).format('YYYY-MM-DD') }, dataType: 'json', cache: false, success: onSuccess, error: function(){ console.log('Whoops, something went wrong.'); } }); } }); |
Let's look at this closely to make sure we understand what's going on. First of all, we're constructing a url for a location-based, daily precipitation request. The URL pattern for any location-based request from the Insight API is as follows:
|
The beforeSend function is important, b/c it adds required headers for authentication and the content type we are expecting. This is where you will insert your App ID and Key. Any and all calls to the api will require these headers.
The data object contains the start and end dates we will be passing as parameters. Here, we're using the excellent moment library to make sure our start/end function parameters are parsed as flexibly as possible.
With all of that in mind, the resulting request for OKC over the month of June would would look something like the following:
|
Once the request is fulfilled, the resulting data will be passed to an onSuccess callback method that we will be defining.
Loading the Chart w/ Data
Our onSuccess method will be creating our chart and loading it with the data resulting from our getLocationData call:
$(document).ready(function(){ // Chart Initialization ... // getLocationData Function ... // onSuccess Function function onSuccess(data){ var seriesData = data.series.map(function(point){ return [parseInt(moment(point.validDate).format('x')), point.value]; }); chart.addSeries({ name: data.latitude + ', ' data.longitude, data: seriesData }); } }); |
Adding a series to our Highstock chart is as simple as creating an array of timestamp/value pairs. The chart will manage any details of plotting your data and configuring chart axes.
Final Touches
Finally, we'll fire off calls to the API for both OKC and San Francisco:
$(document).ready(function(){ // Chart Initialization ... // get_data Function ... // onSuccess Function ... // Request OKC Daily Precip getLocationData({ endpoint: 'daily-precipitation', latitude: 35.4, longitude: -97.5, start: '2016-06-01', end: '2016-06-30', appId: 'YOUR_APP_ID', appKey: 'YOUR_APP_KEY' }, onSuccess); // Request Jacksonville Daily Precip getLocationData({ endpoint: 'daily-precipitation', latitude: 37.7, longitude: -122.4, start: '2016-06-01', end: '2016-06-30', appId: 'YOUR_APP_ID', appKey: 'YOUR_APP_KEY' }, onSuccess); }); |
Your resulting image should look something similiar to this:

It's a simple example, but Insight endpoints can be mixed and matched to create a wide range of useful charts and visualizations. To see the variety of data Insight provides, check out the docs.


